Monday, 26 October 2015

Project - 3D Design & Modelling

Inquiring and Analyzing 


Statement of Inquiry: Digital Design & Printing as a form of communication and output has evolved through time and space to influence audience’s perspective.

Introduction: 

My name is Federica and I am a student in Emirates International School and I study Technology, as part of the MYP design in term 1, I am using the software called TinkerCAD that helps design 3D objects. Computer Aided Design has developed as a unique way of creating 2D/3D objects. I went home and started thinking what I would create using TinkerCAD and why would it be helpful. So as part of the MYP Project I will create a phone holder/ display where you can leave your phone on when you come home.

From personal experience I usually leave my phone everywhere and anywhere possible around the house and always end up forgetting where I placed it last. Sometimes I'm sitting on it or I left it under a cushion or even it may have fallen under the sofa. My phone has always ended up in really weird and unexpected places. I wanted to create this object so I wouldn't have to call it every time I lose it/ forget it somewhere.  My target audience is basically anyone who owns a phone and is forgetful like me, I am planning to do an adult version and a child version, meaning that the adult version would be more sophisticated and posh while the child one will be full of color and emojis. Also I will research online for ideas, if something like this already exists and how can I make it better. I will keep adding information on as I develop my research.

Primary and Secondary Research: 


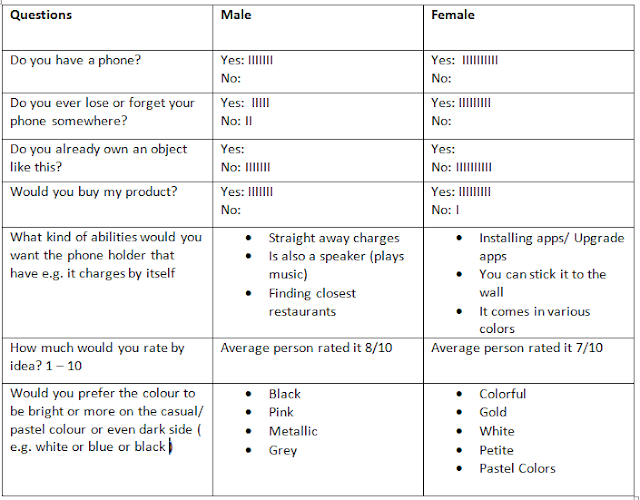
For my primary research, as I said above, I will carry out a survey to my class as well as some Year 7  students. Below is the questionnaire and the answers that I have asked them to answer. I asked 7 boys and 10 girls. After I have collected this information, I thought about the ideas that my friends have given me and I have made some improvements and added somethings to my idea so that my target audience is more likely to buy it.


Looking at the graph and table above I can clearly see that the majority of people are positive about my product. For example the question which asks "Do you already own an object like this?", all of the people answered 'no' which means that my product is creative and not very well known. This graph is proving that my product would sell and it would help a lot of people, giving me the approval to continue my research and creation. 

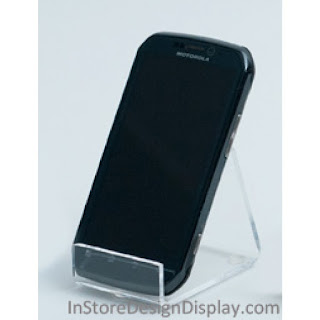
As well as the table  I have searched online some pictures of a phone holder so I can see how to improve mine and even take some inspiration for my idea to develop it. Here are some of the pictures that I have found.


These pictures made me think that, in the pictures the phone isn't really protected and it can easily fall of if you accidentally know the phone holder; the sides aren't really protected while the bottom area where you actually have to click buttons is blocked by the holder. When I will be creating my phone holder, I will keep this in mind. Also all these holders look very boring, either they are transparent or they have just one color to them, I find this very boring and I would never really buy this product; I wouldn't be attracted to it, that is why as I said above, I want mine to be colorful and attractive so people would be more into buying it.  Finally none of these have any qualities that go with the phone folder, they are very simple and not hard to re create, as I mentioned above I want mine to have many qualities for example it can charge itself or it can play music etc. In addition to that, the material of the phone holder will be much better and be better quality to ensure no damages to the phone and the holder.

Looking at all these pictures and searching online, I have come to the conclusion that I will be creating 2 phone holders, the first type of phone holder will be a very simple one and it wont have all the qualities as the second phone holder. I will still be great for the people who don't want to spend a lot of money on it and don't necessarily need all the qualities and effects that the second one would have. This one would be great to just bring around anywhere; you can place it anywhere e.g. you can put it in your car, or when you are at work or for children, they can use it when they are studying. It also doesn't need any charging as it is not related to electronics. The second one is more complex and has more effects and it clearly more technological. Obviously the second one is more expensive as it has more on it. Both of them though will come in the same color, the only difference will be that the second phone holder will additionally come in metallic colors but that is the only difference.

The secondary research is still in the process of being collected as I am still watching videos and searching ideas and facts on the internet.

Wednesday, 21 October 2015

TinkerCAD Lesson 5

TinkerCAD Design 2:


To create this shape I had to:

1. I created the crown today
2. I went on the geometric section and searched for the pink half sphere
3. I sized it to a length of 99mm, width of 94mm and height of 40mm
4. Then I clicked the half sphere but sized it to a width of 9.86.mm and length of 97.40mm and height of 48.31mm
5. I placed that in the middle of the half sphere and on the side of the sphere
6. Then I clicked on star shape and sized it to  length of 15.00mm and width of 14.27mm and height of 4.00mm, I placed it in the middle of the red sphere
7. Then I clicked on the blue diamond and placed it on the left side of the sphere
8. I copied and pasted the diamonds on all the sides
9. Finally I changed the color of the shapes to suit my personality

Reflection: 

I chose this design because I found it really interesting and colorful  as well as it didn't look so complicated. The design wasn't really like this, it was left colorful and more complicated, I changed it a bit but I think it turned out just fine. I actually think it looks better, to be honest. This is a more childish version of the crown, and it would be targeted to children. If I had to do this again, I would do a more complicated version and add more detail and more decorations. I liked to do this design and so far, creating the crown was my favourite part. 

Monday, 19 October 2015

TinkerCAD Homework

Brainstorming For Ideas 


For homework I had to start thinking about what shape to create for the final assessment in ICT. So I went home and started thinking about what kind of object I would like to create and why it would be helpful. So what I thought that I could create was a phone display sort of thing; I still have to work on the name. I thought of this idea because I usually leave my phone everywhere and always end up forgetting where I put or maybe I was sitting on it and when I stood up, it fell and broke. I wanted to create this object so I would have a place to put my phone in whenever I get home but I don't want it to be boring, so I'm thinking to write my name on it, or like place miniature emojis and just make it very persona. I also thought of another idea that if I would have time left, I would even create a a stand where I can place my jewelry in; my jewelry is always around somewhere, my rings some under my bed, some on my desk as well as for my earrings, I lose them very easily. So an organizer would be the ideal thing to create for me. I'm still reflecting and finalizing my ideas but I think that the ones that I have written on my blog today are the ones that I'm going to choose.


Monday, 12 October 2015

TinkerCAD Lesson 4


TinkerCAD Design 1: 

To create this shape I had to: 

House

1. First of all I started making the house 
2. So I went 'shape generators' and on 'geometric' 
3. I searched for the red box and clicked on it
4. I changed the length to 20mm and width 20mm as well as the height to 20mm
5. I then changed the colour of the box to purple
6. Then I searched in the geometric section for the roof 
7. I changed the length to 20mm and width 20mm as well as the height to 10mm
8. To make the door, I clicked again for the red box but made it smaller to fit the house (height of 13mm, length of 9mm and width of 3mm) 
9. To make the chimney I got another red box but sized it to a height of 14mm, width of 8mm and length 7mm and placed it on top of the roof
10. To create the smoke, I searched the sphere in the geometric section and made it small so it could fit the chimney. 
11. When I found the correct size, I just copied and pasted the sphere to make many; to create the tower on top of the chimney.

Snowman

1. I searched the sphere in the geometric section and placed in on the workplane
2. The first sphere is of a length of 24mm, width of 26mm and height of 20mm
3. The second sphere is of a length of 19mm, width of 19mm and a height of 20mm
4. The last sphere is of a length of 16mm, width 16mm and a height of 17mm 

Smiley Face 

1. I searched the cylinder in the geometric section 
2. I flattened it to a height of 3mm, the width is 43mm and the length is 38mm  
3. Then I clicked the sphere and placed two spheres as eyes
4. I then clicked the hole option, so that there would holes as shown in the picture below
5. Then I clicked the half sphere and placed it below the eyes
6. As before I clicked the hole option to make it a hole
7. I clicked on the box and made it to a length of 17.08mm, width of 6.28mm and height of 5,71mm
8. I then clicked on the cylinder and flattened it to a height of 3mm, width of 31mm and length of 45mm
9, I then went on 'letters' option and clicked the letters 'h' and 'i', which obviously spell 'hi' 
10. I then found the exclamation mark and placed it next to the letters. 


Reflection 

I did this design first because it was the one that looked the easiest, and after all it wasn't that hard, though sometimes I got really stuck and had to ask for help to friends. I think it turned out fine, it nearly resembles the picture given to us from Ms. Veena and I gave it my own touch by changing the colours of the shapes to my liking. But as you can see I missed out a shape/ object which is the wagon cart. I missed that one out because I tried building it and using different shapes but it still didn't come out right. I tried undoing the wagon and I tried several times, I didn't give up easily but it still would turn out wrong. So that's why I have all the shapes but not the wagon cart. 


TinkerCAD Lesson 3

TinkerCAD Lesson 4: Key ring, Letters!

To create this shape I had to;
1. Drag the letters to the red base
2. Adjust the size of the red base so it is easier to place the letters
3. Using the black dot on the right side edge of the base resize the red base to fit the length of the text
4. Using the letters I spelled my name on the red base, then I changed the colours or the letters as well as the colour of the base.
5. Delete all the remaining letters
6. Group all the objects together using the group button in the toolbar menu

The skill I learnt in this lesson was to create my own personal key ring. This lesson was a bit more challenging because it had more steps to follow but this lesson as well as made you use your own creativity a lot more than any other lesson I did. I enjoyed this lesson very much and I'm very proud of my work.


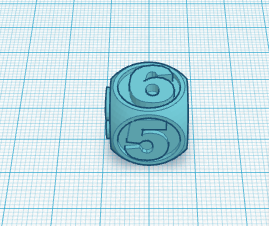
TinkerCAD Lesson 5: Die on the workplane result

To create this shape I had to; 
1. Using the workplane tool just above the shapes, drag and drop the workplane where the blue + symbol is 
2.Move the workplane on to the front side of the die
3. Go to the number shapes by scrolling down the shape list or click the 1 icon
4. Find the number 5 shape and drag it to the area outlined in orange 
5. Scale the number 5 down to a height of 1 mm to the area highlighted in orange 
6. Repeat the steps to place number 6 on top of the die
7. Drag the 6 to the area outlined in orange 
8. Scale it smaller to the height of 1 mm
9. Group all the objects together 


The skill I learnt in this lesson was to make the workplane work for you. This was a lot more complicated and I found it a bit difficult. But in the end I worked out how to do it. This was my last lesson on TinkerCAD so now I'm looking forward to create more shapes and be able to use my creativity more to create amazing things

Monday, 5 October 2015

TinkerCAD - Lesson 2

TinkerCAD - continued 


TinkerCAD Lesson 1: Learning the moves 

To create this shape I had to: 
1. Drag the light brown construction on top of the orange outline construction  
2. It had to be as accurate as possible

The skill I learnt in this lesson was to move shapes along the workplane. It was really easy because it actually just had one step since it was lesson one and there were no hard parts, but it was really good for lesson one. As well it did actually help you to practice your accuracy, and I must admit my hand was kind of shaking when I was dragging the shape. 


TinkerCAD Lesson 2: Camera controls result

To create this shape I had to: 
1. Use the corners on the top left corner to move around; left, right, up, down to see who was actually behind the corner. 
2. Then I used the zoom '+'and '-' buttons to zoom into the picture. 
3. You can also use the scroll on the mouse, to zoom into the picture

The skill I learnt in this lesson was to look around the picture, using the zoom and the corners. It was a little bit confusing in the start because you didn't know which zoom button or arrow to click and sometimes it didn't take you where you wanted it to. But then I got the hang of it and I now know how to look around the shape. 


TinkerCAD Lesson 3: Creating Holes Result

To create this shape I had to:
1. Drag the brown hexagonal prism shape on the area outlined in orange
2. Then I clicked on the Hole feature and chose a cylinder hole
3. I placed the cylinder hole on the other side of the key
4. After that I grouped all three shapes together by pressing shift and clicking the hexagonal prism shape and the cylinder hole; I then clicked the 'group'option which made them group and stick together 

The skill learnt in this lesson was to group shapes together using the group option and by pressing shift. As well I got a chance to also look at the different shapes that are available to use when I'm going to create real objects. This lesson was a bit tricky because I didn't really understand what to do and I'm not sure if I actually did the shape correct but in the end I did learn something. 


TinkerCAD Lesson 4: Scale , Copy and Paste Result

To create this shape I had to:
1. Find the orange cylinder in the shape list 
2. Drag it on the area outlined in orange 
3. Repeat the process, and drag the shape on the area outlined in orange next to the first cylinder  
4. Then using the white dot below the arrow, scale the orange cylinder on the right to a height of 15 mm
5. Then drag another cylinder next to the first cylinder you placed (on the left)
6. Again, using the white dot below of the arrow, scale that cylinder to a height of 15 mm

The skill I learnt in this lesson was how to drag, scale, copy and paste shapes on the workplane. Even though I didn't use it when I was creating the shape because I found the shape immediately, throughout the lesson it told you how to copy and paste a shape. To copy and paste you have to select the shape you want to copy and press the Ctrl+C from your keyboard, after that press Ctrl+V to paste the shape.


Exploring Tinkercad - Inquiring and Analyzing Reflection

On Thursday last week, Miss Veena introduced the whole class to this website called Tinkercad. Basically Tinkercad is this online website that is a 3D printing and designing tool, on it you can design and create whatever shape and object you desire. Also it's pretty easy to learn to use and I feel like children would have a lot of fun creating objects on this website, so my opinion on this website is that it's not only for adults, it's for kids as well. In the lesson, we created a Tinkercad account and then Miss Veena gave us a name of another website, and this was a PDF that explained how to use Tinkercad. So we read it and had a go on it following the steps in the PDF. Practically this lesson was more of exploring and trying out the options on Tinkercad. On Tinkercad you can basically can create anything, there were 'stencils' to create hot dogs, mugs, boat, cars, dolls and lots more. You can change the size and colour of any shape and modify it until you are happy with it. On the PDF, while we were exploring and trying out new things, we had to make this boat out of just shapes, and even though we didn't get to finish it, mine started looking somewhat like a boat, and I was really proud of myself. I had a lot of fun in that lesson and I think it was very interesting, I hope we get to do this kind of things in class more often and I can't wait to see how my final object looks like.