Saturday, 12 December 2015

Criteria D - Evaluating

Peer Evaluation 


Self Evaluation 


Final TinkerCAD Reflection 


Throughout this journey of using TinkerCAD, I have learnt many things that I didn't know before, I didn't only learn how to use TinkerCAD but I also learned improved at using blogger. This year, I must admit, I used blogger way more than I did last year and now I can officially say that I am a sort of pro, I practiced using all the editing options and I even learnt how to upload videos. On TinkerCAD, I learnt how to move shapes, change the size of shapes, re-create pictures and objects and even create my own project. If I had to re-create my project, I would certainly spend more time on creating my designs on TinkerCAD and try to use a variety of shapes and explore further but overall I am really happy on how my project turned out. 

As I said I am really proud of my work and I actually didn't think both models could turn out like this, especially because I am not even close to being a pro with TinkerCAD and still find it hard to work with it and create proper designs and not just shapes. However I do indeed believe that both of my products are good products and I am not ashamed to show people and tell them how happy I am that they turned out like this. I have still kept to my specification on the target audience and I feel like these to phone holders are perfect for any gender and any age who has a phone and even the price isn't to high or to low. From my beginning primary research and my on experience, I truly think that my products could help people with the problem of losing or forgetting their phone, but at the same time help them with the major problem of tangled earphones that everyone deals with everyday. I  enjoyed this journey of discovering and using TinkerCAD, I complete this unit and reflection knowing that throughout these all these weeks, I have learnt something new about technology and about the world. This has helped me understand how products are initially though of, planned and created, it has given me another perspective of the world I live in today. In the future, I will certainly look back at my work and maybe even try and create something new with TinkerCAD.   

Wednesday, 9 December 2015

Criteria C - Creating the Solution

Final TinkerCAD Model 1 - Non Technological Version 


Final TinkerCAD Model 2 - Technological Version 


Description of Model 1 

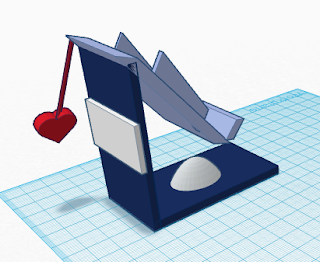
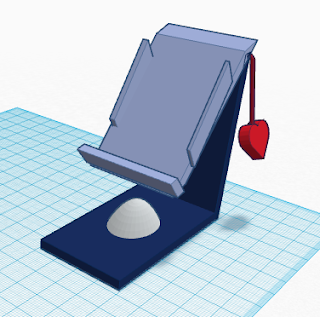
Model 1 is the non - technological model, it is the phone holder that has no techy or electronic abilities. Its only abilities are to hold your phone and hold your earphones, hence the price. The white paraboloid is used to wrap your earphones around so they don't get tangled and you don't waste time having to untangle them, resulting in a frustrated person. I used boxes to create the phone stand and placed parts on the sides to make sure the phone is secure and safe and especially won't fall and break. The dangling heart is to add a pop of colour and decoration, but of course if the customer doesn't want to add it then he/she can take it off. Model 1 can also be attached to the wall or furniture so it doesn't take up so much space - this was requested by one of my peers. This model is suitable for every phone, e.g. Apple, Android, Microsoft, Sony etc.

Description of Model 2 

Model 2 is the techy - electronic version of the phone holder. This version can tell the time, hold your phone, hold your earphones and play music so it's like a speaker and phone holder merged together. The first yellow button is the switch on/off, then the doughnut round thing is for the volume, so you can turn it up or turn it down by twisting the button. The other buttons are for  the music and changing the music option and again the white paraboloid is used to wrap the earphones around so they don't get tangled. As well the phone holder place is secured with extra parts on the sides and in the bottom of the holder so the phone doesn't slip off and fall to the ground.

Overall Reflection 

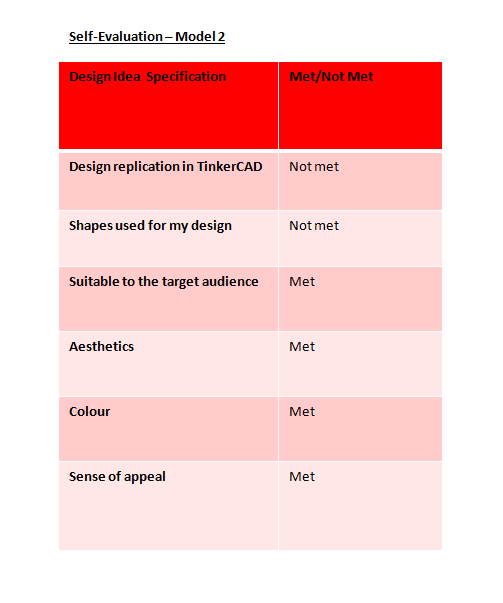
I am really proud of my designs and how they both turned out although I actually prefer model 1 - in my opinion it turned out better and it looked more like my original design. Model 2 was indeed harder to create because of all the detail that I had to pay attention to, all the buttons that were in my hand drawn design had to go onto the TinkerCAD creation, which I must admit was harder than I had thought. Therefore model 2 doesn't exactly look like my original design (the hand-drawn one). I couldn't exactly re-create my idea of model 2 onto TinkerCAD because of the lack of shapes and capability I had on using TinkerCAD, I feel like if I had practiced or completed more lessons on TinkerCAD, my design could've been more complex and it would've looked more interesting. However it wasn't a complete and total failure because it did have things on it that I planned in the beginning and it doesn't look very very different from my original idea. The design still has many things that I wanted it to have, for example, it still shows the time, you can still play music from it, the shape has remained the same and earphones can still be wrapped around the white paraboloid.

Model 1, on the other hand, resembles my design perfectly, I feel like I succeed into creating the phone holder exactly how I wanted it to look like in my head. It has got all the details that my sketch has, and I even managed to add the little heart decoration onto it. Model 1 has the place to put your phone, it has the place the wrap your earphones and you can even hang/ stick it to a wall, desk etc. Exactly how I imagined it! This model has met all my specifications and makes me really happy to say that when I showed some of my peers, they said that if it were ever to go out on the shelves of shops, they would buy it. The only thing that is different from my design is the decoration/addition that I wanted to add to the phone holder. In my sketch, I wanted the decoration/addition to be zodiac signs but unfortunately I couldn't get any so my plan B was to opt for a pretty shape instead. So after deciding between heart and diamond, I finally came to the conclusion that my choice was going to be the heart, hence the heart on the picture above.


Wednesday, 11 November 2015

Developing Ideas - Criteria B

Wednesday 11th November 2015


Part 1 of Design Specification - Description


My product will be the size of an average men's hand and it will be available in different colors, such as pink, green, blue, white, grey, yellow etc as well the technology related model will come in gold and silver . There will also be two kinds of phone case, one that is electronic, so it will have WiFi, it will be able to play music, find your phone immediately, speaker, find restaurants, call friends etc. Instead the other model is the one that is a plain and has no electronic/ technology related effects. They are going to be made out of metal so that it looks more chic and expensive while at the same time they are not at all expensive. I'm still deciding on the shape and the price so I will be adding that onto the Part 2 of Design Specification.


Part 2 of Design Specification - Listed


Aesthetics:

 - color: pumpkin orange, deep carrot orange, Aerolin yellow, non photo blue, Bondi blue, deep sky blue, Tiffany blue, teal, federal blue, Prussian blue, saffron, Dartmouth green, pigment green, mulberry, eggplant purple, plum purple, carmine red, rosso corsa, Hollywood cerise, camel brown, sepia brown, splashed white, white smoke, winter's gate, deep charcoal, rainy day grey, anchor grey

- texture: smooth and shiny

- style: the style is very chic and posh since it is made out of metal ( but teens can also use it because it is not a childish product)

Cost: 

- There are two types of phone cases: the first model ( non technological ) costs 50 Dhs and the second model will cost 120 Dhs which has all the techy abilities it will of course cost

Customer: 

- This product is aimed for anyone who has a phone, or who wants a place to put their phone which is chic, innovative but as well not expensive. This is also not a quite expensive product, unlike similar objects htat you would find in the market which go over 500 Dhs, basically it is a product for anyone. I would also say that it is for both genders since it comes in a variety of different colors and if you had to give a target age, then I would say 13-50's, people who are over 60 may not be in need of a phone holder.

Environmental Considerations: 

- The environmental risks which the second model ( the technological ) has are that green housegases, which technology items send affect the atmosphere as well as weather systems which then result in global warming. Also the ability to use WiFi and play music as well as charge your phone consume resources which aren't renewable ( can't re use ), such as chemicals, natural chemicals and living resources such as animals, forests, fish etc.

Function 

- Basically the main function of both the models is to hold your phone; a place to put your phone when you come home or even if you take it anywhere e.g. on holiday. However there are additional functions/abilities in the second model. In the second model, some additional functions are that it can tell the time, charge your phone, be wireless, play music/ speaker. Also both models have a place where you can wrap your earphones so they don't get jumbled up and it will take you forever to un-do them. As well this phone holder is for Apple. Android, Microsoft, Samsung etc.

Manufacturing 

- Well, to actually make the first model, you don't need so many materials and it's not complicated because the first model is simply made out of plastic and it doesn't have any extra functions. While on the other hand, the second model is more complicated and would require a lot more time and materials as well as knowledge which I don't have; knowledge about parts of a speaker, clock. charger etc. Many more materials would be required, for example the metal that would be used make the actual phone holder, also it would need more attention when it is made and how it is painted, and the details that go into the product.

Software

- The software that I am going to be using is TinkerCAD, the software gives me a variety of shapes and colors to choose from to create my product. What is going to be challenging is that I need to be able to chose the shapes correctly and smartly to be able to create the product the way that I imagine it to look like. Also, this all depends on time but I wish to try other softwares like blender and google sketch to compare those softwares with TinkerCAD.

Safety 

 - Well when thinking about my idea and how it is going to look like, I had to think of how I was going to keep the phone safe and how the phone shouldn't slip off the phone holder and break. I created a phone holder to keep the phone safe not to put the phone in an even more dangerous place.
-  Another point is that by putting this information on the blog, on the materials, size, color, design etc. basically anyone can copy my idea. They can copy the pictures of my sketches and just take it as their own idea, so looking at it from this point of view, my designs and ideas are not safe.

Size 

-  The phone holder should be about the size of an average man's hand, because I didn't want it to be too big and take too much space up because then the people/customers won't know where to place it, but I don't want it to be too small that it is not noticeable and doesn't hold your phone safely.

My Designs - Sketch 


Model 2 of Design 1 - the techy model with technological abilities


Model 2 of Design 2 - the techy model with technological abilities


Model 1 of Design 1 - no technological abilities 


Model 1 of Design 2 - no technological abilities 


References 

Ask (2015) Science: Environmental Science: Human Impact: How does technology affect the environment? 
[Accessed on 16th November 2015] 

Model 1: 

Design 1 meets 6 out of 9 specs, it doesn't meet the safety spec because the phone can slip off really easily as well as it doesn't meet the spec for the size because it is a very small phone holder. Also that design is more aimed at teens and people in their 20s not for every gender and age that I have mentioned above 

Design 2 meets 8 out of 9 specs. The only spec that it doesn't meet it the using TinkerCAD one and completely following my sketch because it is quite complicated to re-create. I will probably have to change some small details to be able to re-create this on TinkerCAD and play around with shapes to get me satisfied with it. 


Model 2: 

Design 1 meets 6 specs out of 9. It doesn't meet the safety spec like the one above because the phone can slip off because there is nothing that really holds it back. Also it doesn't meet the environmental spec because the technology used for it will harm the environment. As well, it doesn't tell the time like design 2 does.

Design 2 meets 7 specs out of 9. The two specs that it doesn't meet are the size because it is bigger than the size I originally chose and that it doesn't have the part where you can place your earphones. Of course it doesn't meet the environmental spec because again the metal and materials/technology we are going to be using is harmful to the environment. 


Finalizing and Choosing 


For model 1, I chose design 1 because it is the one that met the most specs out of the two and even though I will work on it and adjust and make some differences, I personally prefer this design and I feel like it is more of a challenge for me where I can prove to Ms. that I can use TinkerCAD and having asked some friends, they all said that they preferred design 1. Now I don't know how much time Ms Veena is giving us to create the final product on TinkerCAD but I know that I want to really try my best to meet all of the specifications and succeed in creating a chic, inexpensive product which will solve people's problem about forgetting or not charging their phone. 

For model 2, I chose design 2 because again it is the one that met most of my specs and even though I have a lot of work to do and I am planning to change my design a bit and take some ideas from design 1, like the earphone clip/holder as well as changing the size of it. I feel that I can create more things with this and that I will enjoy creating this design than the other one. Again I don't know how much time she is giving us to finalize and create our objects but I sure would want to try other softwares and compare to how the design ends up. 


Specs Met???


Monday, 9 November 2015

Online Security PowerPoint


Tuesday 11th November 2015 

Reflection 


In this lesson my partner ( Famke ) and I had to create a PowerPoint about Online Security - Anti-Virus Software. Creating the slide show didn't take us  long because it was very short; just 2 slides and then the extension was basically finding a few pictures on Anti-Virus Softwares. To be honest, my partner didn't do too much of the work because she got distracted really easily but I didn't really care because we got the work done and she did do some of it at the beginning. Also we presented first and so we got stamps and I just simply really enjoyed the lesson and hope that in the coming year we do a lot of more things like this.

Wednesday, 4 November 2015

Final Checklist for Blog


Thursday 5th November 2015 


Project - 3D Design & Modelling Continuation

Secondary Research

For the first part of my secondary research I was watching videos of on YouTube of people creating DIY phone holders and while watching them, the thing that had an effect on me and made me think was that they were all complaining because of the price, so that has actually made me think of how much I should sell my product for. Also it has given me inspiration of what kind of pattern/color/ shape my phone holder should have.

https://www.youtube.com/watch?v=l5LxyR4kpfA

https://www.youtube.com/watch?v=7F4EN2lFP24

https://www.youtube.com/watch?v=hDIn3AopsTM

For the second part of my secondary research, I changed it up a bit and actually focused on a totally un - related subject. I focused on how using phones can actually have a very bad impact on your health and body.  That's another reason why I was so keen to create a phone holder, to help stop this issue from getting worse. Here are some articles related to this topic:

http://www.theguardian.com/lifeandstyle/shortcuts/2014/nov/24/text-neck-how-smartphones-damaging-our-spines

http://edition.cnn.com/2012/09/20/health/mobile-society-neck-pain/

http://www.telegraph.co.uk/news/health/news/8811596/Mobile-phone-users-suffering-from-text-neck.html


Monday, 26 October 2015

Project - 3D Design & Modelling

Inquiring and Analyzing 


Statement of Inquiry: Digital Design & Printing as a form of communication and output has evolved through time and space to influence audience’s perspective.

Introduction: 

My name is Federica and I am a student in Emirates International School and I study Technology, as part of the MYP design in term 1, I am using the software called TinkerCAD that helps design 3D objects. Computer Aided Design has developed as a unique way of creating 2D/3D objects. I went home and started thinking what I would create using TinkerCAD and why would it be helpful. So as part of the MYP Project I will create a phone holder/ display where you can leave your phone on when you come home.

From personal experience I usually leave my phone everywhere and anywhere possible around the house and always end up forgetting where I placed it last. Sometimes I'm sitting on it or I left it under a cushion or even it may have fallen under the sofa. My phone has always ended up in really weird and unexpected places. I wanted to create this object so I wouldn't have to call it every time I lose it/ forget it somewhere.  My target audience is basically anyone who owns a phone and is forgetful like me, I am planning to do an adult version and a child version, meaning that the adult version would be more sophisticated and posh while the child one will be full of color and emojis. Also I will research online for ideas, if something like this already exists and how can I make it better. I will keep adding information on as I develop my research.

Primary and Secondary Research: 


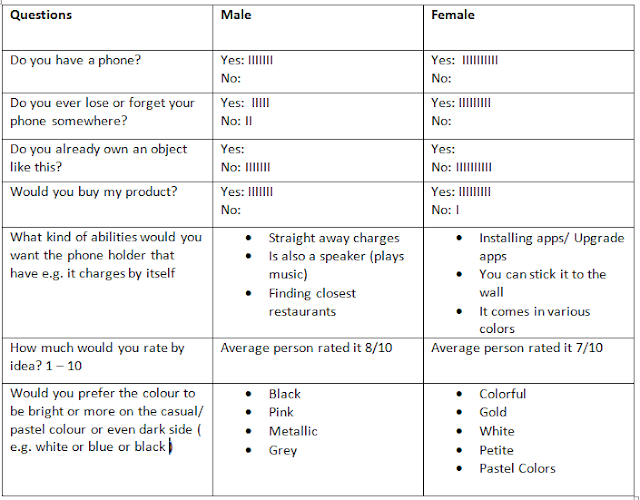
For my primary research, as I said above, I will carry out a survey to my class as well as some Year 7  students. Below is the questionnaire and the answers that I have asked them to answer. I asked 7 boys and 10 girls. After I have collected this information, I thought about the ideas that my friends have given me and I have made some improvements and added somethings to my idea so that my target audience is more likely to buy it.


Looking at the graph and table above I can clearly see that the majority of people are positive about my product. For example the question which asks "Do you already own an object like this?", all of the people answered 'no' which means that my product is creative and not very well known. This graph is proving that my product would sell and it would help a lot of people, giving me the approval to continue my research and creation. 

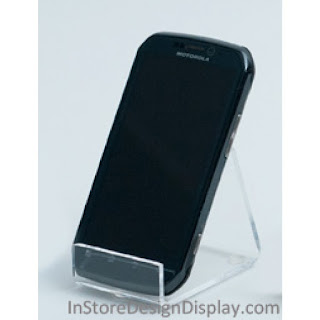
As well as the table  I have searched online some pictures of a phone holder so I can see how to improve mine and even take some inspiration for my idea to develop it. Here are some of the pictures that I have found.


These pictures made me think that, in the pictures the phone isn't really protected and it can easily fall of if you accidentally know the phone holder; the sides aren't really protected while the bottom area where you actually have to click buttons is blocked by the holder. When I will be creating my phone holder, I will keep this in mind. Also all these holders look very boring, either they are transparent or they have just one color to them, I find this very boring and I would never really buy this product; I wouldn't be attracted to it, that is why as I said above, I want mine to be colorful and attractive so people would be more into buying it.  Finally none of these have any qualities that go with the phone folder, they are very simple and not hard to re create, as I mentioned above I want mine to have many qualities for example it can charge itself or it can play music etc. In addition to that, the material of the phone holder will be much better and be better quality to ensure no damages to the phone and the holder.

Looking at all these pictures and searching online, I have come to the conclusion that I will be creating 2 phone holders, the first type of phone holder will be a very simple one and it wont have all the qualities as the second phone holder. I will still be great for the people who don't want to spend a lot of money on it and don't necessarily need all the qualities and effects that the second one would have. This one would be great to just bring around anywhere; you can place it anywhere e.g. you can put it in your car, or when you are at work or for children, they can use it when they are studying. It also doesn't need any charging as it is not related to electronics. The second one is more complex and has more effects and it clearly more technological. Obviously the second one is more expensive as it has more on it. Both of them though will come in the same color, the only difference will be that the second phone holder will additionally come in metallic colors but that is the only difference.

The secondary research is still in the process of being collected as I am still watching videos and searching ideas and facts on the internet.


Wednesday, 21 October 2015

TinkerCAD Lesson 5

TinkerCAD Design 2:


To create this shape I had to:

1. I created the crown today
2. I went on the geometric section and searched for the pink half sphere
3. I sized it to a length of 99mm, width of 94mm and height of 40mm
4. Then I clicked the half sphere but sized it to a width of 9.86.mm and length of 97.40mm and height of 48.31mm
5. I placed that in the middle of the half sphere and on the side of the sphere
6. Then I clicked on star shape and sized it to  length of 15.00mm and width of 14.27mm and height of 4.00mm, I placed it in the middle of the red sphere
7. Then I clicked on the blue diamond and placed it on the left side of the sphere
8. I copied and pasted the diamonds on all the sides
9. Finally I changed the color of the shapes to suit my personality

Reflection: 

I chose this design because I found it really interesting and colorful  as well as it didn't look so complicated. The design wasn't really like this, it was left colorful and more complicated, I changed it a bit but I think it turned out just fine. I actually think it looks better, to be honest. This is a more childish version of the crown, and it would be targeted to children. If I had to do this again, I would do a more complicated version and add more detail and more decorations. I liked to do this design and so far, creating the crown was my favourite part. 

Monday, 19 October 2015

TinkerCAD Homework

Brainstorming For Ideas 


For homework I had to start thinking about what shape to create for the final assessment in ICT. So I went home and started thinking about what kind of object I would like to create and why it would be helpful. So what I thought that I could create was a phone display sort of thing; I still have to work on the name. I thought of this idea because I usually leave my phone everywhere and always end up forgetting where I put or maybe I was sitting on it and when I stood up, it fell and broke. I wanted to create this object so I would have a place to put my phone in whenever I get home but I don't want it to be boring, so I'm thinking to write my name on it, or like place miniature emojis and just make it very persona. I also thought of another idea that if I would have time left, I would even create a a stand where I can place my jewelry in; my jewelry is always around somewhere, my rings some under my bed, some on my desk as well as for my earrings, I lose them very easily. So an organizer would be the ideal thing to create for me. I'm still reflecting and finalizing my ideas but I think that the ones that I have written on my blog today are the ones that I'm going to choose.


Monday, 12 October 2015

TinkerCAD Lesson 4


TinkerCAD Design 1: 

To create this shape I had to: 

House

1. First of all I started making the house 
2. So I went 'shape generators' and on 'geometric' 
3. I searched for the red box and clicked on it
4. I changed the length to 20mm and width 20mm as well as the height to 20mm
5. I then changed the colour of the box to purple
6. Then I searched in the geometric section for the roof 
7. I changed the length to 20mm and width 20mm as well as the height to 10mm
8. To make the door, I clicked again for the red box but made it smaller to fit the house (height of 13mm, length of 9mm and width of 3mm) 
9. To make the chimney I got another red box but sized it to a height of 14mm, width of 8mm and length 7mm and placed it on top of the roof
10. To create the smoke, I searched the sphere in the geometric section and made it small so it could fit the chimney. 
11. When I found the correct size, I just copied and pasted the sphere to make many; to create the tower on top of the chimney.

Snowman

1. I searched the sphere in the geometric section and placed in on the workplane
2. The first sphere is of a length of 24mm, width of 26mm and height of 20mm
3. The second sphere is of a length of 19mm, width of 19mm and a height of 20mm
4. The last sphere is of a length of 16mm, width 16mm and a height of 17mm 

Smiley Face 

1. I searched the cylinder in the geometric section 
2. I flattened it to a height of 3mm, the width is 43mm and the length is 38mm  
3. Then I clicked the sphere and placed two spheres as eyes
4. I then clicked the hole option, so that there would holes as shown in the picture below
5. Then I clicked the half sphere and placed it below the eyes
6. As before I clicked the hole option to make it a hole
7. I clicked on the box and made it to a length of 17.08mm, width of 6.28mm and height of 5,71mm
8. I then clicked on the cylinder and flattened it to a height of 3mm, width of 31mm and length of 45mm
9, I then went on 'letters' option and clicked the letters 'h' and 'i', which obviously spell 'hi' 
10. I then found the exclamation mark and placed it next to the letters. 


Reflection 

I did this design first because it was the one that looked the easiest, and after all it wasn't that hard, though sometimes I got really stuck and had to ask for help to friends. I think it turned out fine, it nearly resembles the picture given to us from Ms. Veena and I gave it my own touch by changing the colours of the shapes to my liking. But as you can see I missed out a shape/ object which is the wagon cart. I missed that one out because I tried building it and using different shapes but it still didn't come out right. I tried undoing the wagon and I tried several times, I didn't give up easily but it still would turn out wrong. So that's why I have all the shapes but not the wagon cart. 


TinkerCAD Lesson 3

TinkerCAD Lesson 4: Key ring, Letters!

To create this shape I had to;
1. Drag the letters to the red base
2. Adjust the size of the red base so it is easier to place the letters
3. Using the black dot on the right side edge of the base resize the red base to fit the length of the text
4. Using the letters I spelled my name on the red base, then I changed the colours or the letters as well as the colour of the base.
5. Delete all the remaining letters
6. Group all the objects together using the group button in the toolbar menu

The skill I learnt in this lesson was to create my own personal key ring. This lesson was a bit more challenging because it had more steps to follow but this lesson as well as made you use your own creativity a lot more than any other lesson I did. I enjoyed this lesson very much and I'm very proud of my work.


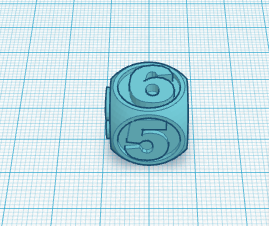
TinkerCAD Lesson 5: Die on the workplane result

To create this shape I had to; 
1. Using the workplane tool just above the shapes, drag and drop the workplane where the blue + symbol is 
2.Move the workplane on to the front side of the die
3. Go to the number shapes by scrolling down the shape list or click the 1 icon
4. Find the number 5 shape and drag it to the area outlined in orange 
5. Scale the number 5 down to a height of 1 mm to the area highlighted in orange 
6. Repeat the steps to place number 6 on top of the die
7. Drag the 6 to the area outlined in orange 
8. Scale it smaller to the height of 1 mm
9. Group all the objects together 


The skill I learnt in this lesson was to make the workplane work for you. This was a lot more complicated and I found it a bit difficult. But in the end I worked out how to do it. This was my last lesson on TinkerCAD so now I'm looking forward to create more shapes and be able to use my creativity more to create amazing things

Monday, 5 October 2015

TinkerCAD - Lesson 2

TinkerCAD - continued 


TinkerCAD Lesson 1: Learning the moves 

To create this shape I had to: 
1. Drag the light brown construction on top of the orange outline construction  
2. It had to be as accurate as possible

The skill I learnt in this lesson was to move shapes along the workplane. It was really easy because it actually just had one step since it was lesson one and there were no hard parts, but it was really good for lesson one. As well it did actually help you to practice your accuracy, and I must admit my hand was kind of shaking when I was dragging the shape. 


TinkerCAD Lesson 2: Camera controls result

To create this shape I had to: 
1. Use the corners on the top left corner to move around; left, right, up, down to see who was actually behind the corner. 
2. Then I used the zoom '+'and '-' buttons to zoom into the picture. 
3. You can also use the scroll on the mouse, to zoom into the picture

The skill I learnt in this lesson was to look around the picture, using the zoom and the corners. It was a little bit confusing in the start because you didn't know which zoom button or arrow to click and sometimes it didn't take you where you wanted it to. But then I got the hang of it and I now know how to look around the shape. 


TinkerCAD Lesson 3: Creating Holes Result

To create this shape I had to:
1. Drag the brown hexagonal prism shape on the area outlined in orange
2. Then I clicked on the Hole feature and chose a cylinder hole
3. I placed the cylinder hole on the other side of the key
4. After that I grouped all three shapes together by pressing shift and clicking the hexagonal prism shape and the cylinder hole; I then clicked the 'group'option which made them group and stick together 

The skill learnt in this lesson was to group shapes together using the group option and by pressing shift. As well I got a chance to also look at the different shapes that are available to use when I'm going to create real objects. This lesson was a bit tricky because I didn't really understand what to do and I'm not sure if I actually did the shape correct but in the end I did learn something. 


TinkerCAD Lesson 4: Scale , Copy and Paste Result

To create this shape I had to:
1. Find the orange cylinder in the shape list 
2. Drag it on the area outlined in orange 
3. Repeat the process, and drag the shape on the area outlined in orange next to the first cylinder  
4. Then using the white dot below the arrow, scale the orange cylinder on the right to a height of 15 mm
5. Then drag another cylinder next to the first cylinder you placed (on the left)
6. Again, using the white dot below of the arrow, scale that cylinder to a height of 15 mm

The skill I learnt in this lesson was how to drag, scale, copy and paste shapes on the workplane. Even though I didn't use it when I was creating the shape because I found the shape immediately, throughout the lesson it told you how to copy and paste a shape. To copy and paste you have to select the shape you want to copy and press the Ctrl+C from your keyboard, after that press Ctrl+V to paste the shape.


Exploring Tinkercad - Inquiring and Analyzing Reflection

On Thursday last week, Miss Veena introduced the whole class to this website called Tinkercad. Basically Tinkercad is this online website that is a 3D printing and designing tool, on it you can design and create whatever shape and object you desire. Also it's pretty easy to learn to use and I feel like children would have a lot of fun creating objects on this website, so my opinion on this website is that it's not only for adults, it's for kids as well. In the lesson, we created a Tinkercad account and then Miss Veena gave us a name of another website, and this was a PDF that explained how to use Tinkercad. So we read it and had a go on it following the steps in the PDF. Practically this lesson was more of exploring and trying out the options on Tinkercad. On Tinkercad you can basically can create anything, there were 'stencils' to create hot dogs, mugs, boat, cars, dolls and lots more. You can change the size and colour of any shape and modify it until you are happy with it. On the PDF, while we were exploring and trying out new things, we had to make this boat out of just shapes, and even though we didn't get to finish it, mine started looking somewhat like a boat, and I was really proud of myself. I had a lot of fun in that lesson and I think it was very interesting, I hope we get to do this kind of things in class more often and I can't wait to see how my final object looks like.

Monday, 21 September 2015

3D Design and Modelling - Inquiring and Analyzing


Johannes Gutenberg was a German inventor who had invented the printing press
process in the 1450’s. His invention allowed the printing of many books. Theprinting press process was a machine that was operated by hand which transferred writing and images/pictures. Basically how it worked was that a frame was used to set groups and of type blocks, these blocks had letters on them and they were placed in reverse. A sheet of paper was laid on the inked blocks, and then the paper and the blocks passed through a roller which made sure that the ink was transferred onto the paper. When the paper is lifted, the reader can see inked letters. The first book to ever be printed was a Latin language Bible, printed in Mainz, Germany; the Bible was then named after him ‘The Gutenberg Bible’.  Johann was in born in 1938 to a very wealthy family, he had a very nice childhood; he got taught to read and write. But the books that he read were written by hand and were only available to rich families as at that time, books were really expensive. Johann wanted to find a way so everyone could have books to read. He moved to Strasburg, Germany and did many experiments to find a faster way of printing. Johann soon ran out of money so he moved back to Mainz (his home city) where he found a layer called Joahann Fust, who gave him the money to continue his experiments. Johann, again, used up a lot of money and Joahann was not happy about it, because he said that Johann was just waisting it and wasn’t getting anywhere. Joahann sewed Johann and took everything away from him. But the printer evolved and spread around Europe and soon hundreds of books were printed. Johann died in Mainz in 1468.


There are two types of printers; the first one is called impact printer and the second is called non – impact printer. An impact printer is a printer that makes contact with paper. It forms the print images/ characters when a print hammer or wheel is pressed against an inked ribbon. As a result of that an image is left on the paper. This kind of printer is usually found in typewriters and Dot Matrix Printers. Non – impact printers are faster and quieter than impact printers because they don’t have as much parts that move as well they don’t hammer against the paper. They print characters and images without the need to have direct contact with printing mechanism and the paper (no pressing or thumping/hammering). Below are a few examples of non – impact printers.


Disadvantages & Advantages of Each Printer:

 Thermal Printers
Advantages:-

  •         They are fairly inexpensive
  •        They are easy to use
  •         They are quiet and don’t make a loud noise when printing


Disadvantages:-
  •         If the machine is too hot then more ink will come out
  •        They are not always precise and neat; they can smudge
  •        They are almost completely monochrome printers
  •         The high heat used in the printing process can damage the print head meaning that the owner has to pay more money to get it fixed = waste of money 

 Dot Matrix Printer


Advantages:-

  •         They are inexpensive and are easily available in the market
  •         Used to make carbon copies
  •        The ink ribbon of the printer is cheap and lasts longer than most of the ink of the other printers
  •         The maintenance price is low
  •         The ink doesn’t become empty suddenly, it slowly starts fading so you get more time to go and change the ribbon


Disadvantages:-

  •         The printing quality of this printer is low
  •        It makes a very loud noise when it is printing
  •         The pins bend easily which the destroy the print head
  •         This printer is very low at printing comparing it to other printers
  •         Paper jams are very hard to fix 


 Daisy Wheel Printer

Advantages:-
  •         The quality of the final print out is very high
  •         It’s not overly expensive
  •         Low maintenance needed


Disadvantages:-
  •         They make a lot of noise when printing
  •         They are slow at printing
  •         You have to change the ink ribbon frequently 


 Inkjet Printer
Advantages:-
  •         They are not expensive
  •         You can create images/documents at high quality – before they were blurry and bad quality
  •         They don’t take up too much space
  •         They don’t require so much time to print

Disadvantages:-
  •         The cartridge is not really  cheap
  •         You can only print a certain amount of documents
  •         The ink sometimes gets clogged
  •          Documents get smudged if you don’t let them dry
  •         replacing the cartridge can cause some problems to the printer


Laser Printer 

Advantages:
  •      They print at a fast rate
  •         They don’t make a loud noise when they print
  •         Colour printing is possible
  •         Printing quality is good

Disadvantages:-
  •         They are more expensive than other printers
  •         They use complicated technology
  •         Fixing any broken parts is expensive
  •         They are dangerous to the health and atmosphere 


     References 
       
       The Great Idea Finder (2007) History: Inventions: Printing Press

Great Site (n.d.) Home: English Bible History:  Johann Gutenberg
[Accessed on 27th September 2015]

PsPrint (n.d.) General: Design and Printing: The Invention of the Printing Press
[Accessed on 27th September 2015]


3D Printing 


3D printing is the process of of making 3 dimensional objects from a digital file, it basically adds volume to your print out/images. There are two kinds of 3D
printers, resin and non - resin. The resin kind of 3D printer uses laser technology which solidifies layer by layer to create the objects. This kind of printer is very expensive and it uses lights and chemicals which are sometimes harmful to the environment. On the other hand the results are more precise than non - resin printers. Non - resin printers are more popular, instead of using chemicals and lasers, this kind of 3D printer uses plastic, food, ceramics or other materials like that. This adds layers on top of layers to create the wanted object. 

The 3D printer starts by creating a virtual sketch of the object which the person wants to create. The virtual design is created using a 'computer aided design' file which uses a 3D modeling program or with a 3D scanner. The 3D modeling program is used when the user wants to create a totally new object, instead with the scanner the user uses it to copy an existing object; the 3D scanner then creates a digtial copy, in 3D of the object wanted by the user. 

In simple steps this is how a 3D printer works:

  1. The user creates his idea in a computer file
  2. The computer file is prepared from the machine 
  3. The computer file travels to the 3D printing machine 
  4. A layer of powder is spread out in the 3D printer 
  5. Then the temperature of the machine is increased 
  6. A laser hardens the hardens the powder and the model gets its' shape
  7. Another layer of powder is spread out in the 3D printer
  8. And the process is repeated many times until the object is completely finished 
  9. Then the model is lifted out of the 3D printer and cleaned
Not all the 3D printers use the same technology; there are several ways to print . Certain methods melt or soften the material which produces the layers; these are specific names SLS (Selective laser sintering), FDM (Fused deposition modeling) and SLA (stereolithography). 3D printing is used for rapid prototyping (first version of a product), architectural scale models, maquettes (a sculptors first sketch),  healthcare, entertainment (e.g. props), the reconstruction of fossils, replicating ancient artifacts (archaeology), reconstructing very damaged evidence from crime scenes, business and industrial equipment, education and other consumer - product industries. 3D printers are used by students, businesses and designers. 3D printers make it possible to experiment with e.g. fashion and architecture (buildings, houses etc.)  


References 

Kids Code Computer and Science Magazine (2015) February 2015 Issue: What is 3D printing?
https://www.kidscodecs.com/what-is-3d-printing/
[Accessed on 30 September 2015]

3D Printing (n.d.) Home: Articles: What is 3D printing?
http://3dprinting.com/what-is-3d-printing/
[Accessed on 30 September 2015]

3ders - 3D printer & 3D printing news (n.d.) Home: 3D printing 
http://www.3ders.org/3d-printing.html
[Accessed on 30 September 2015]

Reflection 

This research task was very interesting because I learnt many new things about the history of printing in general but as well I learnt about modern printing and how it has evolved throughout these past years. In addition I have discoverer 3D printing, which I never new existed, and I also learnt how the 3D printer works and what it is used for, for example, a 3D printer can be used by students, business and/or designers for certain things like fashion and architecture. I found this lesson very interesting and fascinating especially because I learnt something different and it wasn't just the usual research about boring things. In addition to learning something new, I got the chance to practice my referencing skills (Harvard way) which is always a good thing because even though I know how to reference it is always good to have a little practice especially because I don't only need to reference in ICT, I need to know how to do it in all my subjects. I really enjoyed this lesson and hope we do lessons similar to this in the future.